Wednesday, December 12, 2012

Uncertain Salvation?

Here's the first page to one of my books. I still don't have a firm title. Read it and let me know what you think!

A Letter:

            Dear Mom and Dad,

            I know I said I would be home soon. I’m sorry that I can’t make that come true anymore. It will probably be awhile before you see this and doubtless many will tell you that I’m dead. I’m not dead. I’m very alive. And if I could come home, I would. I love you both so much! I hope that this helps explain where I am and why you can never see me again.

1: Ogden-Heber City

            There’s a strange fascination with Sasquatch and skunk apes. People are constantly claiming that they’ve seen Big Foot or Sasquatch or whatever. Once, I knew what that fascination was. Now, I’d just as soon they left me alone. Now that I know what skunk apes are all about, I wish I didn’t. Makes it hard to sleep at night, ya know?

            You’re probably wondering where I’m going with this. After all, I think the majority of people are sensible enough to believe skunk apes are fictional, figments of an overactive imagination. While I enjoyed watching the shows about Bigfoot, I have to admit I used to be a skeptic. The irony of me being skeptical now…Well, let me tell you from the beginning. It will make more sense that way.

            My name is April. I was a student at Weber State University in Ogden, UT. I hadn’t really picked a major yet, so what I was studying didn’t matter. It’s not like I’ve really been able to use what I’ve learned. Who does, really? I had your usual paperwork to get done, just like other students; math homework, a research paper, reading and studying. Nothing big or unusual.

            Yup, that was me. Nothing big or unusual. It was nearing Halloween and my roommates and I decided to have a party. I was in the bathroom getting ready because my roommates said they had invited boys. So I needed to look good. Well, as good as possible. I’m pretty average looking, to be honest. I’d make a great spy if I had spectacular spy skills in my repertoire! I don’t, in case you were wondering.

            I have brown hair with honey and red highlights that usually show up in the summer. No amount of tanning seems to turn my pale skin tan. I’m pretty much a nightlight year round. Most people say I have brown eyes. I think they’re hazel because the brown is only on the inside. They lighten to a golden green color on the outside. But you have to look close for that. Most people don’t gaze into your eyes that closely. It would be pretty creepy. My height makes me stand out. A little. I’m about 5’ 10”.

            The apes showed up that Halloween night. I didn’t know what they were then, nor did I know what they really looked like. The skunk apes you see on TV are just ideas of what the creatures look like. And they’ve had several different species all lumped into one. The apes that showed up that night weren’t very similar to those make believe renditions.

Monday, December 10, 2012

Sasquatch

The first book that will be coming out (probably via cheap kindle books on amazon) is science fiction and will be about Sasquatch's cousin, the skunk ape. Okay, in most circles, 'skunk ape' is another name for sasquatch. That's the joy of writing..."creative liberties." :) Title is still forthcoming. I'll let you know a more precise release date when I finish the third review of the book. Although hopeful that I will be able to publish this book traditionally, I'm not entirely certain my chances will be good. This book will have a sequel.

The second book still has a ways to go. It will be a fantasy book about a young girl who accidentally bonds with a dragon and ends up becoming the king's intended. I'm probably 25% done with this book and hoping it will go more the traditional route of publishing. We'll see. :) This book will also have a sequel.

Monday, November 5, 2012

Books

So, I've been working pretty hard on two books. That's why there haven't been many posts here. I'm really excited about one. I read a lot and haven't read another with characters like this (that I can think of). I'll be sure to post some sneak peek chapters when I finish my books! One of them should be soonish. :)

Thursday, October 25, 2012

Cajun Chicken Pasta

I don't know why, but I always thought Cajun Chicken Pasta would be harder. After making it a few times, I've discovered that it's not only easy, but it's also a fairly quick meal!
These are my leftovers...it's still delicious and creamy the next day! This particular recipe serves two, although I haven't found a need to increase the amount of chicken when I double the recipe, nor do I use as much bell pepper. In this batch, I used half a green and about a quarter red. But my family doesn't like pepper as much. Looking at the recipe, I didn't use as much cream as it calls for either. So there's definitely room for variation! Anyways, here's the recipe that makes 2 servings. :)

4 oz pasta
2 chicken breasts, cut into strips
1 green onion, minced
1 1/2 c heavy cream (you can use half and half, too)
2 t cajun seasoning
2 T butter
1 green bell pepper
1/2 red bell pepper
4 fresh mushrooms sliced (I haven't used these, so their optional!)
1/4 t dried basil
1/4 t lemon pepper
1/4 t salt
1/8 t garlic powder (I've also used garlic salt)
1/8 t black pepper
2 T parmesan cheese
1. Boil the pasta.
2. While it's boiling, toss the chicken in the cajun seasoning, then saute the chicken in butter.
3. While that's cooking, chop, mince, and slice your peppers, mushrooms, and green onion.
4. Add vegetables and fungus (haha, couldn't resist!) to cooked chicken. Saute 2-3 minutes.
5. Reduce heat and stir in heavy cream.
6. Add seasonings and heat through.
7. Toss pasta in sauce and top with more parmesan if desired.
 
Honestly, this probably takes about 30 minutes to throw together (assuming you have all ingredients on hand). It's a great meal! Especially if you have fresh rolls or garlic/french bread to the side...mmmm...and a green salad is yummy with this also...Hmmmm...when am I eating this next? ;)

Tuesday, October 16, 2012

Pumpkin Bread Bowls

My son found these at the grocery store. We had bread bowls on the menu for dinner, but I didn't really want to take the time to make my own. Not only were these easier to make (haha!) but so festive, too!

If you were to make them on your own (which I will...someday), then it looks like you need to separate out a bit of the dough. In other words, separate your dough into four large balls. From each ball, take a smaller portion to make the stem. I would get the pumpkin part and add a little bit of orange dye to the dough. The stem bit, I would add green dye to it, then place it on top of the pumpkin to raise, then bake.

Okay, just thought of an option two. Beat two egg yolks (one yolk in one bowl, the other in another). Add 2-4 drops of green dye to one yolk and 2-4 drops of red and yellow dye to the other. After your bread has raised (but before baking), "paint" the different sections onto your pumpkin bread bowl. If you're REALLY good, you could get a black dye and paint a face onto it!

Do it and tell me how it turned out for you.

Saturday, October 13, 2012

Paper Bag Monsters

I did some babysitting not that long ago. I knew it was going to be several hours long, so I tried planning ahead--I didn't want them to sit the entire time in front of the tv, but I also knew that they wouldn't play outside the entire time (it ended up being about 6 hours). I also had things inside that I still needed to do. So I came up with a quick, easy craft that all the kids could do and then play with.
 These two (above) were done by the 2 and 3 year old. The three (below) were done by a 4, 10, and 7 year old.
They spent about a half hour on the paper bag monsters and would have kept going if I hadn't needed to start making dinner. The paper bags are just the sandwich bags you can get at the grocery store (less than $2 for 50 of them). I had pipe cleaners, glue, crayons, markers, paper, safety scissors, tape, and googly eyes on hand already.
So give it a shot! Get some bags, put them in front of your kids with supplies, and let them at it!

Thursday, October 11, 2012

Easy Snack

I don't know if you're like me, but when it comes to snack time, the easier the better! I know that if I get complicated, I usually give the kids more of a meal than a snack. I'll also end up with MORE dishes to do! I HATE doing dishes!! So, here's one that's SUPER easy to put together and your kids are pretty sure to like it (unless they have allergies or are really picky eaters).
You might be asking yourself at this point, "Am I seeing this right? Peanut butter on a spoon and chocolate chips?" Yes, yes you are. My kids love it! I scoop out the peanut butter on the spoon, give them a handful of chocolate chips, and they add the chips however and wherever they want them. We usually drink water or milk to help wash down the peanut butter. Another bonus? This one spoonful curbs MY appetite and sweet tooth also!

Tuesday, October 9, 2012

Changing Thoughts

So, on a more serious and less creative note...

In case you hadn't figured it out, I am religious. I believe in Christ. Because of my belief, I try to be like Him and do what I believe He would do. Being mortal, I'm not always successful. That doesn't mean that I give up, though. I'm a work in progress. :)

Christ has told us to think of Him always. If you've ever tried that, it's not the easiest thing to do. We've also been told to be engaged in a good cause. It's so easy to get busy and forget this. One of the areas that's most difficult for me to be engaged in is my thoughts. I can appear to be doing what I'm supposed to be doing, but my head is a million miles away! I wonder how much living I've missed out on because of this. Well, it's stopping now. I am changing my thoughts, one day at a time!

If you've ever tried changing something, you realize it's a give and take process. If you don't have something to replace what you're used to doing (e.g. smoking, thinking, watching tv), then you WILL go back to that habit. In the church I go to (and I think it's pretty common), we have a hymnal of some 336 hymns. I've set myself the goal to memorize ALL of them...LoL That should keep me busy! I've memorized four so far...And you know what? It has helped. I constantly have uplifting music running through my head. And if I start to slip, I immediately do a self-check on the current hymn I'm trying to memorize. It has helped a lot.

Another technique I'm using is to think of my family and what they might need. I go person by person and think of my observations of them that day and what I can do for them tomorrow to help them be happier. I usually fall asleep doing that. :)

Above all, I ask the Lord for help. I ask him to help me replace the bad thoughts with good ones and to help me despise the bad thoughts so that I won't have a desire to return to them.

It's been a good experience. I recommend you try it. :)

Thursday, October 4, 2012

Slithery Snake Bread

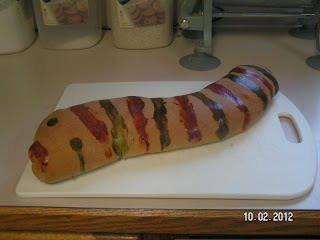
So, I'm working to get my kids in the Halloween spirit. At the same time, I want to make some fun memories for them. I have a book from Taste of Home that is Halloween/Fall themed and I've selected several recipes to try from there.  Here's this one! It's the sausage stuff slithery snake bread. The recipe calls for frozen bread dough (I used Rhodes whole wheat), but you could use just about any type of bread dough. You roll the dough out into a rectangle and place whatever you want inside down the center, pressing it slightly into the dough.Our snake is stuffed with sausage, mozarella cheese, spinach, parmesan cheese, and some seasonings (like garlic and oregano). Pinch the edges together and place seam side down. For the stripes, use egg yolks and food coloring. I don't have anything to paint food with, so I just used my finger to apply the yolk. This is the snake before baking...
And here it is after baking! 350 for 25-30 minutes, or until golden brown.
Our biggest complaint...it tastes like it should be a side dish or like it should have some sort of marinara sauce to dip it in. Gooey brains (spaghetti) would probably be a great addition! And if you're wondering...my 4 year old and 2 year old liked it and my husband said it was pretty good, too!

Wednesday, October 3, 2012

Halloween Craft

One of my friends from Talented Terrace Girls found this craft. http://www.keepingitsimplecrafts.com/2011/09/spooktacular-2x4-halloween-characters.html It's cute, quick, and STURDY! In a house of small people, sturdy is important.
All you need is 5 2x4's, some vinyl lettering and faces, and paint. I used gauze and a tree stick too add a bit to  my mummy and the pumpkin (yes, there is a stick as a stem on the pumpkin, although it's hard to see). I suppose I should add that I used a REALLY strong wood glue to put everything together and some mod podge. As my friend said, the mod podge helps keep the vinyl from rolling off. If you have the time and everything together, you could finish this in one evening, a few hours. Mine took a few days, since I also have kids to take care of and I wanted to make sure everything had dried completely.

Tuesday, September 25, 2012

Oreo Cake

I have something to admit...my kids think that Family Home Evening is the dessert...LoL
I guess that's okay. They enjoy getting together as a family and I enjoy trying new recipes. :) It's a win-win!
 
It really was a simple recipe, although there are a few observations that I'll make. Don't mind the fridge or the lopsidedness of the cake...apparently our oven isn't sitting evenly...
You'll need:
1 devil's food cake mix
4 squares of BAKER's semi-sweet chocolate
1/4 C butter
1 pkg (8 oz) of cream cheese, softened
1/2 c sugar
2 c thawed cool whip
12 oreo cookies, coarsely crushed.
1. Bake cake according to directions in two round cake pans, then cool completely. Place one round on a plate.
2. Melt butter and chocolate in a microwave safe bowl. Stir until well blended and cool.
3. Mix cream cheese and sugar together until smooth. Add coolwhip and blend gently. Add oreos.
4. Spread cool whip mixture on top of cake. Top with other round of cake. Drizzle chocolate over the top.
Options: Here are a few things I wondered and noticed.
First: I'll bet you could drizzle some of the chocolate on the plate first. You'll notice that it gets kind of hard (you need to keep this dessert refrigerated) like the topper ice cream cones you can get from restaurants. I'll bet that crust would be yummy on the bottom!
Second: ADD THE COOL WHIP FIRST! I added the oreos first. I noticed it was turning a greyish color. So I don't think I blended the cream cheese/cool whip as well.
Third: I would recommend more oreos. There just weren't enough, in my opinion. I would probably add another six oreos.
 
It was delicious! Give it a try!


Monday, September 24, 2012

Life

It's true...sometimes life just runs you over. Last week was one of those weeks, which is why you didn't see much from me. But don't worry! I may have been absent, but I have not forgotten! I have another project almost completed, a few new foods that I've made, and a story to update. I have another idea floating around, although it might take me a bit longer to put together. Never fear! There will be more updates coming soon! :)

Tuesday, September 18, 2012

Terrific Tuesday: Cake Batter Fudge

I try to make sure to give credit where it's due...the original recipe is found here: http://www.sixsistersstuff.com/2012/03/friday-fun-list-50-easy-delicious-no.html The "Six Sisters' Stuff" blog contains many of my favorite food recipes. Go check them out!
 
1 14 oz can of sweet and condensed milk
3 1/2 c white chocolate chips (about 1 3/4 bag)
3 t vanilla extract
1/2 t almond extract
Sprinkles
1. Melt chocolate chips in the sweet and condensed milk in the microwave in a microwave safe bowl-about 2-3 minutes. DO NOT OVERHEAT. If you've never melted chocolate in the microwave, pull it out after a minute and give it a stir. The sneaky chips retain their shape until you stir them up! Stir until the chips and milk are blended and smoot.
2. Immediately vanilla and almond extract, stirring until well blended.
3. Throw about a handful and a half of sprinkles into the fudge, folding gently. DO NOT overstir or the sprinkles will all melt and turn the fudge an ugly gray.
4. Pour into an 8 x 8 in pan or 11 x 7 in pan. I've got an 8 x 8 here. It's about an inch deep. If you want, I sprinkled a few sprinkles on the bottom of the pan before adding the fudge, then I added some more on top after pouring.
5. Cool, either to room temperature or in the fridge.
This is extremely rich fudge! The smaller cut outs are to show you about how much I take at a time and it lasts me half a day...and I have an extreme sweet tooth addiction... ;)

Monday, September 17, 2012

Mad Monday: Writer's Digest Challenge

So, I follow the Writer's Digest on Twitter (you can follow me, too: smilingrayita) and a few days ago (okay, about 14) they offered a 12 day writing challenge. The 12th day was to pick your favorite and publish it. Here's mine, a 20 line poem of a memorable moment.

In a Moment of Faith
Inspired by Love
I said
Yes.
 
On a Windy Hill
O'erlooked by Dead
He asked
Me.
 
A Sweet Letter read
An Uncertain Look
We laughed
Together
 
The Future Together
We There pledged
I loved
Him.
 
No End in Time
Our Love's Eternal
This I
Know.

Sunday, September 16, 2012

A Little Late: Storytime Saturday

We're a little late...this has been a hectic weekend! But it's better late than never! The Storytime Saturday page has been updated with an adventure for Super Zip! Will she be able to save her friend? Will anyone find out her secret (probably not ;) )? Find out now!

Wednesday, September 12, 2012

Wonders of Wednesday: Baby Afghan

 Okay, I think it's pretty obvious that I'm not quite done with this baby afghan. I still have the border to go, then I have to tuck all the edges. That being said...here's the back...
...and here's the front.
I don't have the directions anymore, kinda did the squares mostly from my head. I started this several years ago as a present...then got pregnant, so I intended it for my baby...then got sick...then got busy...and am just now finishing it! Each square is a bit larger than my hand (maybe 4-5 inches?). It was about 14 dc with the red.
Anyways, I dc the white until it was about done, then did a dc border of red with 3 dc in the corners. the brown is a sc around the edges, then um, I don't remember the name of this stitch. Dc, but don't pull through the second loop. You only pull through the first. Do this 3 or 4 times, so that you have 4 loops on hook, then pull through all at once. sc in the last red dc before the 3 in the corner, sc in each of the 3, then do the stitch that I don't remember the name of again. Finally, I don't have a crocheting needle, so I simple sc all the squares together. I plan on sc for the border, possibly making that poofy stitch again on the corners (I have to laugh at my 3 month old talking to the tv! It's so cute!).

Feel free to ask questions. I'll do the stitch again so that I can more accurately recreate what I did. :) Happy crocheting!

Tuesday, September 11, 2012

Tasty Tuesday: Chimis

For a time, my husband and I lived in the Dominican Republic. We loved it there, especially the people and the food! One of our streetside favorites was the chimi. It looks like a hamburger, but tastes...not like a hamburger...LoL It's delicious! If you're ever in the country, BUY ONE! So I've been on the lookout for a chimi recipe. This one was good, but it did NOT taste like a chimi. We rather thought it tasted more like a meatloaf.

So, here's what you need for the burger: 1 1/4 lb ground beef (I have 2 lbs here), 1 medium onion (I used a large onion because you use more later on. Also, the Dominicans I knew generally used the purple ones), 1/2 lg green bell pepper, 2 garlic cloves, 1/3 C chopped cilantro, 1 t dried oregano, 2 t soy sauce, 1 T worcestershire sauce.
 Mix your beef, onion, pepper, garlic, cilantro, oregano, soy sauce, worcestershire sauce, scant 1/2 t salt, 1/2 t pepper. I think it would work better if you could chop everything (except the hamburger) in a food processor so it's almost a puree, then squish it into your hamburger.
 It says to make 4 patties, I made seven (obviously). These were LARGE patties and one burger was VERY filling! Next, get your toppings prepped: 2 cups thinly sliced cabbage, 1 carrot, 1 small red onion (remember that lg onion I mentioned earlier?), 1 tomato.

Next, lightly toast your hamburger buns on a griddle (all cooking will be done on a griddle).
 

 Then cook your hamburgers, about 8 minutes for medium rare, turn once. When finished, place on hamburger buns.
While your burgers are cooking, prepare you sauce:  2 T ketchup, 2 T mayo, 1 T yellow mustard mixed together.
 Mix your cabbage, carrots, and 1/4 t of salt, then cook on the griddle after the hamburgers are done. Turn once or twice. Only cook until the cabbage starts to wilt. Divide on top of hamburgers.
 Now you get to sear your onion and tomatoes. Only cook for about 2 minutes, turning once. FYI, the tomatoes used in the Dominican Republic were more green than red.
 Add the cabbage, then tomato and onion, top everything with your sauce, and enjoy! It is a VERY messy burger, btw. It was pretty tasty, but definitely NOT a chimi.
 

Monday, September 10, 2012

Guest Post-Talented Terrace Girls

Hi! My name is Keri and I blog over at Talented Terrace Girls and The Home Teacher. I am excited to be writing a guest post for such an amazing site! Enjoy!

I recently opened up my teacher closet searching for goodies. Not the kind that you can eat- no, those end up going to the party in my tummy (shout out to Yo Gabba Gabba). I was looking through my many boxes of math curriculum from my school teaching days to see what I could use for my Boo. And although I pulled every box out of the closet (there were several), the favorite manipulative of choice was one sitting on the top in a long thin box........my trusty number balance scale.
[IMG_2787.jpg]
I bought this for my second graders as a good way to show true number sentences. Like 6 + 1 = 7..... It is a great visual- you put weights on the numbers 6 and 1 on one side, and then 7 on the other side, and it balances out. And it helped out when we talked about untrue number sentences (or the unequals sign). Untrue number sentences wouldn't balance out. It's a great tool!

So I KNEW that there would have to be some ways that I could use this teaching tool for my tot! And this is the list of what I came up with- some we have tried, some have yet to be tried- but I thought I would share this to inspire the math teacher in us all. 
  1. Simple Number Recognition game - divide the scale into half- one side is yours, one side is your tots. I always take the left hand side since the numbers are going from right to left, and I want my tot to see them the "counting up" way- but really it doesn't matter. You place a weight on any number- let's say 4. You then have your tot place a weight on their number 4. Your tot will know if he/she got it right because the scale will balance.
  2. Extension of the Simple Number Recognition game- instead of placing a number on the scale, put weights on every single number on both sides. You take a number away and tell your tot something cheezy like "Numbers, numbers, I am going to pick......5! Now you pick 5!" With your older tot you can go into details about how the scale becomes unbalanced.
  3. Very Simple Addition game (needs to be able to recognize numbers 1-10) - place a small number of weights on the number one on your side of the scale. ask your tot "how many weights do I have?" Have him/her count the scales and place one weight on their side of the scale on the answer. Again, your tot will know if he/she got it right because the scale will balance.
  4. Count With Me game- give you and your tot ten weights. Out loud, count from one to ten together while each of you place a weight on the appropriate side of the scale. This will help your tot to see the numbers while saying them... it's a pretty simple activity!
  5. Guess Your digit game- place your weight on any number on your side of the scale. Cover your side so your tot can't see where you placed your number (not quite sure how to do that...hmm, I will have to think about it) Have your tot try and guess your number by placing his/her weight on different numbers until the scale balances. Then a correct answer can be given!
  6. An extension of the Guess Your Digit game- place 2 weights on your side of the scale (make sure the sum of these numbers is 10 or less). Have your child find the sum by placing a weight on a number and looking to see if the scale balances. As I am writing this I am being very wary of the actual learning that might be taking place- it seems more of a guessing game- but there is absolutely nothing wrong with a little exploration every now and then and who knows- this might spark some curiosity in your little one to learn to add. I would use this more as a skill builder after your child has been taught this skill. If they already know that 2 + 2 = 4, then this would be a great way to show them. Or if you were counting the people in your family- and you had your tot count 3 girls and 2 boys, then it would be a great way to show that 3 + 2 (on one side of the scale) equals 5 (on the other side) because it balances. And you could go back and add everyone up just to make sure you were correct! I hope this is making sense!
  7. Tell Me What You Have game- give your tot some weights (2 to start out with, then you can add more as they grasp this game) Have them place the weights on any numbers- even the same number twice! Then have them TELL you where to place the weights. For example, I have 1 weight on 3, and 2 weights on 7- or more simply 1 three and 2 sevens. This will be great for developing some math language and giving them a great foundation for addition and multiplication.
  8. On the back of our scale, there are blank circles that are intended for you to create your own scale. How fun would it be to (on both sides of the scale) write 10 letters of the alphabet , or draw 10 shapes, or 10 different numbers, or pictures of 10 different family members for the wee ones- and have your tot find the match on the other side! And of course, if they get the answer right, the scale will balance! This might take some extra work to set up initially, but would a great hands on activity for ANY matching practice!
OK, so I hope one or all of these games will be helpful to you! Math can be such a FUN subject to teach (at least for the little ones- upper division math is a whole other story)
Happy TEACHing!

Saturday, September 8, 2012

Storytime Saturday

What a day! But I have finally updated Storytime Saturday!  Check out the page and leave a comment. Would you rather I added to the length of Storytime Saturday or posted the updated story as a post? Let me know!

Friday, September 7, 2012

Cricuts

So, I don't own one and I'm not really into scrapbooking, but my son's preschool teacher is letting me use hers to get some projects done for her (yeah for people who give you a discount for helping out!). Yes, I'm talking about the "Cricut" machine. It's AMAZING. And no, I'm not getting paid to advertise this.

Basically, imagine all those annoying, difficult cut out shapes. Are you thinking of them? The aching hands, dull scissors, and time spent? Well, now you have a machine that does it for you! All you need is one cricut, the sticky pads to put your paper on, a "spatula" utensil that takes your paper off, and whatever plug-in program you want (right now, I'm cutting out those really cute monsters you see everywhere right now). It's so effective that I'm almost convinced that maybe I might try scrapbooking...notice all of those non-commital words in that sentence before you hold me to it, though. :)

Thursday, September 6, 2012

Apostrophe's in Singular Possession

Quick and simple. Add an 's to any word that owns something. For example:

"That book belongs to John" can be rewritten as "That book is John's."

Note the 's on the end of John.

Now, the tricky part really isn't that tricky. If the word already ends in 's', just add an apostrophe.

"Thomas' bike is red."

Is there an exception? Of course there's an exception! This is the English language we're talking about... :D The exception is if the word is one syllable (kiss versus kiss-es; or cat versus kit-ten).

So, here are more examples, both the ones following the rule and the exceptions.

John's book.
Ethan's garage.
Candace's money.
Emily's friends.
Kiss's concert.
My boss's job.
The class's pet.
The cactus' spines.
The goddess' love.
A mistress' dress.

Wednesday, September 5, 2012

Wonders of Wednesday: Finger Paints!

Man! After my daughter started running a fever, I wasn't sure if I was going to get to this post today or not! But we made it and her fever is under control (thank you, medicine!). We decided to try some homemade finger paints. I found the recipe here http://easiepeasie.blogspot.com/2010/07/homemade-finger-paints.html. Here's what you need: 2 cups warm water, 1/2 cup corn starch, 3 T sugar, 1/2 t salt.
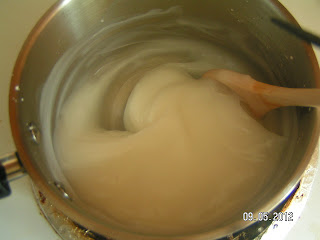
Combine all ingredients in a medium sauce pan. It kind of looks like milk. Stir frequently to constantly for about 10 minutes (I was able to wash our electric griddle at the same time).
After about 10 minutes, it should start to thicken up. First it looked like the sugar was balling up and I was worried that I had messed up somewhere. But keep going! Pretty soon it all holds together like glue (without the stick).
Now choose your colors and mix them up. I only used two drops per color when mixing these (except for red, I let my two year old add those drops and who knows how many drops she added!). This was fun for the kids to see what happens when you mix colors and to watch how a little bit can go a long ways! The brownish/grayish color is all of the colors mixed together.
This is how it looks on construction paper. It didn't apply like I thought it would, but it does feel really neat! I think the colors look a little water-colory as far as paints go. It also adds some neat texture to whatever you decide to paint, since the more intense areas of color are where it's applied more like a glue.
My kids loved this project! It was simple and (again) clean up was a snap! After I wash their painting shirts, I'll let you know about "stainability" of this paint.

Tuesday, September 4, 2012

Tasty Tuesday: Chocolate Chip Cookie

One of the lovely ladies from Talented Terrace Girls will be our guest blogger on Monday. They are all incredibly talented, so make sure you check it out! http://www.talentedterracegirls.blogspot.com/
 
Meanwhile, I decided to try a "one serving" recipe. I chose the chocolate chip cookie, since I've been having sweet cravings lately. http://lacreativitedelafille.blogspot.com/2012/06/single-serving-deep-dish-chocolate-chip.html is the originator of this recipe. I tried it out and am giving step by step instructions (with pictures!).
First, ignore the mess and focus on the ingredients. Your basic cookie ingredients: butter, brown and white sugar, egg yolk, vanilla, flour, salt, and chocolate chips. The mug you see is where I mixed and cooked the cookie. That's a big plus with me. Very little mess!

Melt 1 T butter, add 1 T brown sugar and 1 T of white sugar, 3 drops of vanilla. I mixed these before adding the egg yolk to give the butter more time to cool. Add egg yolk. It should looks something like this. Some people who commented mentioned using the egg whites instead of the yolk.
 Next, add a pinch of salt and 1/4 C flour. Appears to be cookie dough, doesn't it?
 Now 2 T of chocolate chips and it's ready to go in the microwave! As cookie doughs go, I didn't think this dough was very tasty, so I wouldn't recommend eating it raw (not to mention the raw egg...).
 Now, one of the commenters mentioned that they have a high powered microwave. When they first tried it, it didn't turn out. But when they dropped to around 720 watts, it worked perfectly. You can see that I have a 1250 watt microwave, so I cooked at 60% power.
 I microwaved between 1:30 and 2:00 minutes. In retrospect, I should have quit when it looked a little more doughy on the outside. The microwave cooks from the inside out so instead of burning the outside, it's the inside you have to watch out for (mine's a little crunchy, not quite to the burned stage).
It tastes more like a cake cookie than a chocolate chip cookie, so don't expect "cookie" when you initially eat it. All in all, this is a decent recipe. Probably not something I would make for company, but for that random sweet tooth craving that I usually get. Happy treats!

Monday, September 3, 2012

Mad Monday

So, here's my first invite! Go to the comments section of this post and tell me what you would like to post about on my blog. :) The winner will be invited to create next Monday's post. If you have your own blog, you can even cheat and repost or link to there!

The winner will be announced/informed Tuesday.

Saturday, September 1, 2012

Storytime Saturday

So, my oldest has decided that he likes "tell" stories better than "read" stories. So I've been making up stories for him before bedtime (I admit, I have reverted to telling several classics such as "The Three Little Pigs" and "Little Red Riding Hood"). I realized that he might like to have these later. And maybe you'd like to be able to adapt them to your own children.

Each Saturday, check out the Story Page for the next installment of the Superhero Trio! Yes, each of my kids just gained a superpower. ;)

Friday, August 31, 2012

Free Friday: Apple Cider Vinegar

It works!

Recently, we had an influx of drain flies. They're annoying, little flies that tend to show up in bathrooms and kitchen. Apparently, they're some type of moth that reproduces at a ridiculous rate! I've read that they lay eggs in the "organic slime" that lives inside of our drains. The eggs hatch within 48 hours and they live for about 2-3 weeks (which rapidly mulitplies into nastiness!).

Well, several internet people recommend "killing" the organic slime, others said to pour bleach down the drain...I decided to go with soap and apple cider vinegar. I'm still not certain why you put the soap in...maybe it traps their bodies deeper down? It's heavier than the vinegar and sinks to the bottom. Day one, we had a ton of flies in there! Day two, not as many...but then, there weren't as many to catch. I think I'm going to go one more day to hopefully catch all the fellows that are hatching. This is a picture of day two. The black flecks are the flies. Yesterday (day 1), there was a pretty nasty black flecky ring around the outside.

I should warn you: it stinks! Our entire apartment (granted, it's a little apartment) smells funny. But it's been very effective. It's a keeper that I will be using again!

Thursday, August 30, 2012

Apostraphe's in Contractions

Okay, here comes the grammar police! :)

Good grammar is important, even though many people like to think it's outdated. My husband and I frequently argue over this. And when it comes to verbal communication, I tend to agree with most of my husband's arguments. Good grammar isn't as important when verbally communicating because there are so many other cues used to clear up misconceptions.

However, written grammar is extremely important because those cues have been removed! The reader can ask for clarification if it's a blog format or a chat window, but response times vary between quickly and never. So here's a quick mini-lesson on the use of the apostraphe as a contraction.

It's really very easy. You take two words that are near each other in a sentence, remove some letters, and put the contraction in place. Common examples:
can not = can't
do not = don't
will not = won't
I have = I've
You have = You've
I am = I'm
She would = She'd
It is = It's
Here is = Here's
See a pattern there?  Generally, the first word retains it's original form and everything except for the last letter or two is removed from the second letter (except for Will Not...I don't know why it contracts the way it does).

There you have it! Go ahead and play around with it. But remember, the odder you get, the less likely people are to understand you. ;)

Work Sheet will be coming!

Saturday, August 25, 2012

24 Hours in Palma de Majorca

“This is my version of a perfect 24 hours on a Spanish Island. This post was written as an entry for 24 hours on The Balearics contest sponsored by OnTheBeach.co.uk. The prize is £500 in Amazon Vouchers and the contest runs until August 31, 2012. Please visit BeersandBeans.com to learn more about the contest and how you can also enter.”

I have not traveled to Spain or any of its outlying islands...this doesn't mean that I don't want to someday! It was so much fun researching everything that I just have to write about it as if I had been there. This should read like an excerpt from my imaginary travel journal (we all need one to keep our dreams in). I will be changing names of family members, though. It makes my husband uncomfortable to have his name on floating around the internet.

"We were finally able to fit in a trip, my husband, three kids and I. I was so excited! We traveled to Palma de Majorca. At first, John and I thought we'd be able to use Spanish, our second language. Turned out, we didn't need it! It's a tourist country with plenty of diversity in language, though I've read about Germans joking that it should be part of their country with how many visit each year.

"Our plane arrived at 11 am in Palma de Majorca. Feeling adventurous, we used the public transportation to get from the airport to our hotel, "Cala Major." What a beautiful place! If we had a week, it wouldn't be enough time! Unfortunately, we only have until 11 am the next day. We wouldn't be spending much time here, though. Not immediately, at least. We had a tour to make!

"After dropping off our luggage, we found a map of the city with the concierge and used the buses to make our way to the Caves of Genova. They were absolutely incredible! We descended with the rest of our group into the pit, only to enter an entirely new world. The stalactites and stalagmites were amazing! The kids couldn't believe that all of this was just under our feet...of course, Henry is a little nervous now and thinks that everywhere has caves like this under us.

"When the tour ended, we ate lunch at the Jardin (we had made reservations before leaving the U.S.). It was quite the restaurant! They had a great variety of traditional, local foods. We each made sure to order something different so that we could sample the different tastes of the island. The kids really wanted to say that they've been in the Mediterranen, so after we finished eating we went back to the hotel and played on the beach. It helped that I wanted to soak up some sun and freshen up before we headed to dinner: Pirates Adventure show.

"And what a show! Their acrobatics were incredible and the story was fun to watch! The kids really enjoyed watching it and I'm glad I took them. I was thinking about using the hotel baby-sitting services and having a date-night with John. This was incredible for all of us, though! We headed to bed happily exhausted that night, ready to get up early the next morning.

"The next morning, we got up early and headed to Cathedral "Le Seu" here in Palma. I had heard that you should see the morning sun coming in through the stained glass. What an incredible structure! We were able to walk around, but touring hours didn't start until later. Ooops! Oh well, now that we had a taste, we would see if we could come back for a longer stay. This has been an incredible adventure. We had breakfast on the street Passeig de Born, like several people recommended...and of course ended up spending more money than we should in the shops there! That's why they call it a vacation!

We went to Marineland after checking our bags at the airport. It was similar to Sea World, but more exciting because it wasn't closer to home, but in a foreign country! The smaller size of the park allowed us to see more in a short period of time before we headed back to the airport. We were exhausted, but when you only have 24 hours, you squeeze in what you can!"

Thursday, August 23, 2012

Education

Okay, I'm switching things up! I was going to have a page reserved for education, but I figure that this will work just as well. There's SO MUCH to learn! Like research. You have NO IDEA how much you use research. A few things I've researched lately: medical conditions, travel plans, gas prices, growth rates, tv times, Christmas presents...Imagine if I didn't generalize like that! A few tips to think about:

1.) As you research, what you're looking for should narrow itself down. Otherwise, you don't really have an interest in finding something out.
2.) When you find an answer, validate it through several different locations. This is especially important when doing internet research. Yes, people who publish in books can lie also, but it takes a lot more money to do it so they're less likely.
3.) Compare, compare, compare! What may seem like a good price in one place may be better somewhere else. Don't be afraid to shop around.
4.) Make a list. If you're like me, you just don't have time to sit down and get it all done at once. This is really important for me when I'm looking at travel ideas. I begin broad (location), find a few items of interest, then later figure out if they're possible or close to each other.

Good luck with your own researching! There's lots to find in the wide world around us. :)

Wednesday, August 22, 2012

Writing Triangle

So I was laying in bed considering the writer's triangle. How could I have forgotten? There are three elements to the writer's triangle (okay, there are several "triangles" I'm using the more modern version). You have "Writer" -> "Purpose" -> "Audience." All of those things create your message. I realized that I have not chosen an audience. It has definitely created sub-par writing.

Now I have a struggle. Who is my audience? I could say "you," except that I don't know you. Are you a you that enjoys philosophy? Education? Art? Literature? Partying? Who are you? I think it will help when I discover this. For now, I'm going to have to give you a name: Unknown. I know, not very creative, but it helps me to focus my writing.

So, when you're writing, remember that you need all three to create a message to someone. The writer: That's you. The Purpose: Why you're writing. And The Audience: That's You. All three combined will create the message...and be warned! The message you write may not be the message you intended the audience to receive. ;)

Tuesday, August 21, 2012

Norwex

Today was a stressful day...we had a Norwex party! However, it was a lot of fun. I find myself intrigued by the product. The fiber is 1/200th the size of a human hair and there's silver imbedded in the fabric. Apparently, the silver kills the bacteria and what-not while the microfiber picks everything up. That means all you need is a cloth and some water for cleaning. Clearly, I'm not getting paid for this. But I still think it's worth checking out!

Monday, August 20, 2012

A Week of Kids Meals


5 meals kids enjoy eating (and mom can stand them, too!). You can combine these however you want or separate them and have just part of it as a meal. I didn’t count calories for any of the meals (I’m not a counter). Fruits and vegetables can be switched out for any other fruit or veggie you have on hand. The kids LOVE to have fruit with their meals, though! The veggies are a bit more difficult for them to enjoy, but I'll bet if I would have added a dip for them, they'd do better.

1: Chicken nuggets, macaroni and cheese, pears, ketchup. Chicken nuggets with apple sauce is another the kids really like eating. I just wanted meat with their mac and cheese.

 2: Peanut butter and honey with Clementines (the cutie tangerines). I like the tangerines because they're SO EASY for the kids to peel. They love having that little bit of independence. You could use oranges, if you wanted. We didn’t have any jam on hand, so it’s the honey we ended up with. Jam would be an easy substitute.
 
3: Chicken salad sandwich with lettuce, carrots, cucumber, strawberries, blueberries. You could do tuna fish as well. Love the colors on this plate!...and I think I need to have these again!
4: Beef and cheese quesadilla, salsa, strawberries, blueberries. I used leftover roast for the beef. Sandwich meat, chicken, etc. would work for the meat.
5: Grilled cheese sandwiches, tomato soup, crackers, glass of milk. Sometimes (more for me), I’ll do grilled tuna fish sandwiches. You can add a slice of cheese and some lettuce to the grilled tuna. My husband likes cream of mushroom soup instead. The kids love it when I add an ice cube to their soup. At first the kids didn’t want to eat the soup, then we started calling it “hot lava” soup and now they can’t get enough! J

Tuesday, August 14, 2012

Trigger Finger (or Thumb)

So, here's something I feel everyone should know about, just because I had no idea about it until we took our daughter to the doc. Several months ago, she came in telling us that her finger hurt (it was really her thumb). Looking at it, it appeared that she had dislocated her thumb somehow. Pulling VERY gently on her thumb, we also discovered that we could straighten her thumb out. Naturally, we took her to the doctor.

After a few x-rays, we discovered that nothing was technically wrong with her hand. That's when the PA said, "I think she has trigger thumb and would like to refer you to a specialist." Huh? We had never heard of it! Apparently, there's a "pulley" in the base of her thumb that controls the tendon extending and bending her thumb. In trigger finger (or thumb), the tendon gets caught on the pulley when the digit is bent and doesn't straighten back out. The theory is that eventually the digit will no longer be able to extend.

At the specialist, he said that most kids have trigger thumb (or finger) until about 2 years of age. They generally grow out of it, but she didn't. The specialist was able to force her thumb straight. There was a loud POP and it went straight. She wasn't hurt by it, but it was startling!There aren't any conclusive studies on whether or not it affects their motor development, but he said most parents aren't willing to take the chance that it will. We went ahead with the surgery. It was VERY quick. We got there at 7:15 am and were on the way home by 10:30 am. She's all unbandaged now and healed up.

If you know someone who decided to wait, I would love to hear whether or not if affected their development. We have noticed that she seems to be doing things differently with her hand, so I personally think it was causing her to adjust to compensate for her thumb.

Monday, August 13, 2012

Stories

Maybe this seems silly to you, but I've learned something more from kid cartoons than how to speak a different language or count or recognize shapes. I learned a great story layout for little kids. Here it is:

1. A goal.
2. An obstacle.
3. An obstacle.
4. Reach their goal.

I tried this method with  my 2 1/2 year old last night and she wanted another story quickly. My hubby did "_____ the Astronaut" with my son, and I told a story about "Princess _______" (insert child's name into blank). My daughter's eyes would light up every time I'd say her name. Go for it! Make it up on the spot and watch your kids happiness grow. :)