Tuesday, September 25, 2012

Oreo Cake

I have something to admit...my kids think that Family Home Evening is the dessert...LoL
I guess that's okay. They enjoy getting together as a family and I enjoy trying new recipes. :) It's a win-win!
 
It really was a simple recipe, although there are a few observations that I'll make. Don't mind the fridge or the lopsidedness of the cake...apparently our oven isn't sitting evenly...
You'll need:
1 devil's food cake mix
4 squares of BAKER's semi-sweet chocolate
1/4 C butter
1 pkg (8 oz) of cream cheese, softened
1/2 c sugar
2 c thawed cool whip
12 oreo cookies, coarsely crushed.
1. Bake cake according to directions in two round cake pans, then cool completely. Place one round on a plate.
2. Melt butter and chocolate in a microwave safe bowl. Stir until well blended and cool.
3. Mix cream cheese and sugar together until smooth. Add coolwhip and blend gently. Add oreos.
4. Spread cool whip mixture on top of cake. Top with other round of cake. Drizzle chocolate over the top.
Options: Here are a few things I wondered and noticed.
First: I'll bet you could drizzle some of the chocolate on the plate first. You'll notice that it gets kind of hard (you need to keep this dessert refrigerated) like the topper ice cream cones you can get from restaurants. I'll bet that crust would be yummy on the bottom!
Second: ADD THE COOL WHIP FIRST! I added the oreos first. I noticed it was turning a greyish color. So I don't think I blended the cream cheese/cool whip as well.
Third: I would recommend more oreos. There just weren't enough, in my opinion. I would probably add another six oreos.
 
It was delicious! Give it a try!


Monday, September 24, 2012

Life

It's true...sometimes life just runs you over. Last week was one of those weeks, which is why you didn't see much from me. But don't worry! I may have been absent, but I have not forgotten! I have another project almost completed, a few new foods that I've made, and a story to update. I have another idea floating around, although it might take me a bit longer to put together. Never fear! There will be more updates coming soon! :)

Tuesday, September 18, 2012

Terrific Tuesday: Cake Batter Fudge

I try to make sure to give credit where it's due...the original recipe is found here: http://www.sixsistersstuff.com/2012/03/friday-fun-list-50-easy-delicious-no.html The "Six Sisters' Stuff" blog contains many of my favorite food recipes. Go check them out!
 
1 14 oz can of sweet and condensed milk
3 1/2 c white chocolate chips (about 1 3/4 bag)
3 t vanilla extract
1/2 t almond extract
Sprinkles
1. Melt chocolate chips in the sweet and condensed milk in the microwave in a microwave safe bowl-about 2-3 minutes. DO NOT OVERHEAT. If you've never melted chocolate in the microwave, pull it out after a minute and give it a stir. The sneaky chips retain their shape until you stir them up! Stir until the chips and milk are blended and smoot.
2. Immediately vanilla and almond extract, stirring until well blended.
3. Throw about a handful and a half of sprinkles into the fudge, folding gently. DO NOT overstir or the sprinkles will all melt and turn the fudge an ugly gray.
4. Pour into an 8 x 8 in pan or 11 x 7 in pan. I've got an 8 x 8 here. It's about an inch deep. If you want, I sprinkled a few sprinkles on the bottom of the pan before adding the fudge, then I added some more on top after pouring.
5. Cool, either to room temperature or in the fridge.
This is extremely rich fudge! The smaller cut outs are to show you about how much I take at a time and it lasts me half a day...and I have an extreme sweet tooth addiction... ;)

Monday, September 17, 2012

Mad Monday: Writer's Digest Challenge

So, I follow the Writer's Digest on Twitter (you can follow me, too: smilingrayita) and a few days ago (okay, about 14) they offered a 12 day writing challenge. The 12th day was to pick your favorite and publish it. Here's mine, a 20 line poem of a memorable moment.

In a Moment of Faith
Inspired by Love
I said
Yes.
 
On a Windy Hill
O'erlooked by Dead
He asked
Me.
 
A Sweet Letter read
An Uncertain Look
We laughed
Together
 
The Future Together
We There pledged
I loved
Him.
 
No End in Time
Our Love's Eternal
This I
Know.

Sunday, September 16, 2012

A Little Late: Storytime Saturday

We're a little late...this has been a hectic weekend! But it's better late than never! The Storytime Saturday page has been updated with an adventure for Super Zip! Will she be able to save her friend? Will anyone find out her secret (probably not ;) )? Find out now!

Wednesday, September 12, 2012

Wonders of Wednesday: Baby Afghan

 Okay, I think it's pretty obvious that I'm not quite done with this baby afghan. I still have the border to go, then I have to tuck all the edges. That being said...here's the back...
...and here's the front.
I don't have the directions anymore, kinda did the squares mostly from my head. I started this several years ago as a present...then got pregnant, so I intended it for my baby...then got sick...then got busy...and am just now finishing it! Each square is a bit larger than my hand (maybe 4-5 inches?). It was about 14 dc with the red.
Anyways, I dc the white until it was about done, then did a dc border of red with 3 dc in the corners. the brown is a sc around the edges, then um, I don't remember the name of this stitch. Dc, but don't pull through the second loop. You only pull through the first. Do this 3 or 4 times, so that you have 4 loops on hook, then pull through all at once. sc in the last red dc before the 3 in the corner, sc in each of the 3, then do the stitch that I don't remember the name of again. Finally, I don't have a crocheting needle, so I simple sc all the squares together. I plan on sc for the border, possibly making that poofy stitch again on the corners (I have to laugh at my 3 month old talking to the tv! It's so cute!).

Feel free to ask questions. I'll do the stitch again so that I can more accurately recreate what I did. :) Happy crocheting!

Tuesday, September 11, 2012

Tasty Tuesday: Chimis

For a time, my husband and I lived in the Dominican Republic. We loved it there, especially the people and the food! One of our streetside favorites was the chimi. It looks like a hamburger, but tastes...not like a hamburger...LoL It's delicious! If you're ever in the country, BUY ONE! So I've been on the lookout for a chimi recipe. This one was good, but it did NOT taste like a chimi. We rather thought it tasted more like a meatloaf.

So, here's what you need for the burger: 1 1/4 lb ground beef (I have 2 lbs here), 1 medium onion (I used a large onion because you use more later on. Also, the Dominicans I knew generally used the purple ones), 1/2 lg green bell pepper, 2 garlic cloves, 1/3 C chopped cilantro, 1 t dried oregano, 2 t soy sauce, 1 T worcestershire sauce.
 Mix your beef, onion, pepper, garlic, cilantro, oregano, soy sauce, worcestershire sauce, scant 1/2 t salt, 1/2 t pepper. I think it would work better if you could chop everything (except the hamburger) in a food processor so it's almost a puree, then squish it into your hamburger.
 It says to make 4 patties, I made seven (obviously). These were LARGE patties and one burger was VERY filling! Next, get your toppings prepped: 2 cups thinly sliced cabbage, 1 carrot, 1 small red onion (remember that lg onion I mentioned earlier?), 1 tomato.

Next, lightly toast your hamburger buns on a griddle (all cooking will be done on a griddle).
 

 Then cook your hamburgers, about 8 minutes for medium rare, turn once. When finished, place on hamburger buns.
While your burgers are cooking, prepare you sauce:  2 T ketchup, 2 T mayo, 1 T yellow mustard mixed together.
 Mix your cabbage, carrots, and 1/4 t of salt, then cook on the griddle after the hamburgers are done. Turn once or twice. Only cook until the cabbage starts to wilt. Divide on top of hamburgers.
 Now you get to sear your onion and tomatoes. Only cook for about 2 minutes, turning once. FYI, the tomatoes used in the Dominican Republic were more green than red.
 Add the cabbage, then tomato and onion, top everything with your sauce, and enjoy! It is a VERY messy burger, btw. It was pretty tasty, but definitely NOT a chimi.
 

Monday, September 10, 2012

Guest Post-Talented Terrace Girls

Hi! My name is Keri and I blog over at Talented Terrace Girls and The Home Teacher. I am excited to be writing a guest post for such an amazing site! Enjoy!

I recently opened up my teacher closet searching for goodies. Not the kind that you can eat- no, those end up going to the party in my tummy (shout out to Yo Gabba Gabba). I was looking through my many boxes of math curriculum from my school teaching days to see what I could use for my Boo. And although I pulled every box out of the closet (there were several), the favorite manipulative of choice was one sitting on the top in a long thin box........my trusty number balance scale.
[IMG_2787.jpg]
I bought this for my second graders as a good way to show true number sentences. Like 6 + 1 = 7..... It is a great visual- you put weights on the numbers 6 and 1 on one side, and then 7 on the other side, and it balances out. And it helped out when we talked about untrue number sentences (or the unequals sign). Untrue number sentences wouldn't balance out. It's a great tool!

So I KNEW that there would have to be some ways that I could use this teaching tool for my tot! And this is the list of what I came up with- some we have tried, some have yet to be tried- but I thought I would share this to inspire the math teacher in us all. 
  1. Simple Number Recognition game - divide the scale into half- one side is yours, one side is your tots. I always take the left hand side since the numbers are going from right to left, and I want my tot to see them the "counting up" way- but really it doesn't matter. You place a weight on any number- let's say 4. You then have your tot place a weight on their number 4. Your tot will know if he/she got it right because the scale will balance.
  2. Extension of the Simple Number Recognition game- instead of placing a number on the scale, put weights on every single number on both sides. You take a number away and tell your tot something cheezy like "Numbers, numbers, I am going to pick......5! Now you pick 5!" With your older tot you can go into details about how the scale becomes unbalanced.
  3. Very Simple Addition game (needs to be able to recognize numbers 1-10) - place a small number of weights on the number one on your side of the scale. ask your tot "how many weights do I have?" Have him/her count the scales and place one weight on their side of the scale on the answer. Again, your tot will know if he/she got it right because the scale will balance.
  4. Count With Me game- give you and your tot ten weights. Out loud, count from one to ten together while each of you place a weight on the appropriate side of the scale. This will help your tot to see the numbers while saying them... it's a pretty simple activity!
  5. Guess Your digit game- place your weight on any number on your side of the scale. Cover your side so your tot can't see where you placed your number (not quite sure how to do that...hmm, I will have to think about it) Have your tot try and guess your number by placing his/her weight on different numbers until the scale balances. Then a correct answer can be given!
  6. An extension of the Guess Your Digit game- place 2 weights on your side of the scale (make sure the sum of these numbers is 10 or less). Have your child find the sum by placing a weight on a number and looking to see if the scale balances. As I am writing this I am being very wary of the actual learning that might be taking place- it seems more of a guessing game- but there is absolutely nothing wrong with a little exploration every now and then and who knows- this might spark some curiosity in your little one to learn to add. I would use this more as a skill builder after your child has been taught this skill. If they already know that 2 + 2 = 4, then this would be a great way to show them. Or if you were counting the people in your family- and you had your tot count 3 girls and 2 boys, then it would be a great way to show that 3 + 2 (on one side of the scale) equals 5 (on the other side) because it balances. And you could go back and add everyone up just to make sure you were correct! I hope this is making sense!
  7. Tell Me What You Have game- give your tot some weights (2 to start out with, then you can add more as they grasp this game) Have them place the weights on any numbers- even the same number twice! Then have them TELL you where to place the weights. For example, I have 1 weight on 3, and 2 weights on 7- or more simply 1 three and 2 sevens. This will be great for developing some math language and giving them a great foundation for addition and multiplication.
  8. On the back of our scale, there are blank circles that are intended for you to create your own scale. How fun would it be to (on both sides of the scale) write 10 letters of the alphabet , or draw 10 shapes, or 10 different numbers, or pictures of 10 different family members for the wee ones- and have your tot find the match on the other side! And of course, if they get the answer right, the scale will balance! This might take some extra work to set up initially, but would a great hands on activity for ANY matching practice!
OK, so I hope one or all of these games will be helpful to you! Math can be such a FUN subject to teach (at least for the little ones- upper division math is a whole other story)
Happy TEACHing!

Saturday, September 8, 2012

Storytime Saturday

What a day! But I have finally updated Storytime Saturday!  Check out the page and leave a comment. Would you rather I added to the length of Storytime Saturday or posted the updated story as a post? Let me know!

Friday, September 7, 2012

Cricuts

So, I don't own one and I'm not really into scrapbooking, but my son's preschool teacher is letting me use hers to get some projects done for her (yeah for people who give you a discount for helping out!). Yes, I'm talking about the "Cricut" machine. It's AMAZING. And no, I'm not getting paid to advertise this.

Basically, imagine all those annoying, difficult cut out shapes. Are you thinking of them? The aching hands, dull scissors, and time spent? Well, now you have a machine that does it for you! All you need is one cricut, the sticky pads to put your paper on, a "spatula" utensil that takes your paper off, and whatever plug-in program you want (right now, I'm cutting out those really cute monsters you see everywhere right now). It's so effective that I'm almost convinced that maybe I might try scrapbooking...notice all of those non-commital words in that sentence before you hold me to it, though. :)

Thursday, September 6, 2012

Apostrophe's in Singular Possession

Quick and simple. Add an 's to any word that owns something. For example:

"That book belongs to John" can be rewritten as "That book is John's."

Note the 's on the end of John.

Now, the tricky part really isn't that tricky. If the word already ends in 's', just add an apostrophe.

"Thomas' bike is red."

Is there an exception? Of course there's an exception! This is the English language we're talking about... :D The exception is if the word is one syllable (kiss versus kiss-es; or cat versus kit-ten).

So, here are more examples, both the ones following the rule and the exceptions.

John's book.
Ethan's garage.
Candace's money.
Emily's friends.
Kiss's concert.
My boss's job.
The class's pet.
The cactus' spines.
The goddess' love.
A mistress' dress.

Wednesday, September 5, 2012

Wonders of Wednesday: Finger Paints!

Man! After my daughter started running a fever, I wasn't sure if I was going to get to this post today or not! But we made it and her fever is under control (thank you, medicine!). We decided to try some homemade finger paints. I found the recipe here http://easiepeasie.blogspot.com/2010/07/homemade-finger-paints.html. Here's what you need: 2 cups warm water, 1/2 cup corn starch, 3 T sugar, 1/2 t salt.
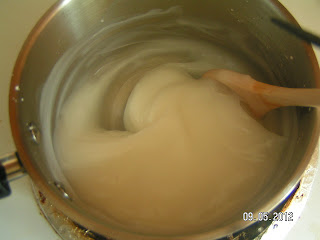
Combine all ingredients in a medium sauce pan. It kind of looks like milk. Stir frequently to constantly for about 10 minutes (I was able to wash our electric griddle at the same time).
After about 10 minutes, it should start to thicken up. First it looked like the sugar was balling up and I was worried that I had messed up somewhere. But keep going! Pretty soon it all holds together like glue (without the stick).
Now choose your colors and mix them up. I only used two drops per color when mixing these (except for red, I let my two year old add those drops and who knows how many drops she added!). This was fun for the kids to see what happens when you mix colors and to watch how a little bit can go a long ways! The brownish/grayish color is all of the colors mixed together.
This is how it looks on construction paper. It didn't apply like I thought it would, but it does feel really neat! I think the colors look a little water-colory as far as paints go. It also adds some neat texture to whatever you decide to paint, since the more intense areas of color are where it's applied more like a glue.
My kids loved this project! It was simple and (again) clean up was a snap! After I wash their painting shirts, I'll let you know about "stainability" of this paint.

Tuesday, September 4, 2012

Tasty Tuesday: Chocolate Chip Cookie

One of the lovely ladies from Talented Terrace Girls will be our guest blogger on Monday. They are all incredibly talented, so make sure you check it out! http://www.talentedterracegirls.blogspot.com/
 
Meanwhile, I decided to try a "one serving" recipe. I chose the chocolate chip cookie, since I've been having sweet cravings lately. http://lacreativitedelafille.blogspot.com/2012/06/single-serving-deep-dish-chocolate-chip.html is the originator of this recipe. I tried it out and am giving step by step instructions (with pictures!).
First, ignore the mess and focus on the ingredients. Your basic cookie ingredients: butter, brown and white sugar, egg yolk, vanilla, flour, salt, and chocolate chips. The mug you see is where I mixed and cooked the cookie. That's a big plus with me. Very little mess!

Melt 1 T butter, add 1 T brown sugar and 1 T of white sugar, 3 drops of vanilla. I mixed these before adding the egg yolk to give the butter more time to cool. Add egg yolk. It should looks something like this. Some people who commented mentioned using the egg whites instead of the yolk.
 Next, add a pinch of salt and 1/4 C flour. Appears to be cookie dough, doesn't it?
 Now 2 T of chocolate chips and it's ready to go in the microwave! As cookie doughs go, I didn't think this dough was very tasty, so I wouldn't recommend eating it raw (not to mention the raw egg...).
 Now, one of the commenters mentioned that they have a high powered microwave. When they first tried it, it didn't turn out. But when they dropped to around 720 watts, it worked perfectly. You can see that I have a 1250 watt microwave, so I cooked at 60% power.
 I microwaved between 1:30 and 2:00 minutes. In retrospect, I should have quit when it looked a little more doughy on the outside. The microwave cooks from the inside out so instead of burning the outside, it's the inside you have to watch out for (mine's a little crunchy, not quite to the burned stage).
It tastes more like a cake cookie than a chocolate chip cookie, so don't expect "cookie" when you initially eat it. All in all, this is a decent recipe. Probably not something I would make for company, but for that random sweet tooth craving that I usually get. Happy treats!

Monday, September 3, 2012

Mad Monday

So, here's my first invite! Go to the comments section of this post and tell me what you would like to post about on my blog. :) The winner will be invited to create next Monday's post. If you have your own blog, you can even cheat and repost or link to there!

The winner will be announced/informed Tuesday.

Saturday, September 1, 2012

Storytime Saturday

So, my oldest has decided that he likes "tell" stories better than "read" stories. So I've been making up stories for him before bedtime (I admit, I have reverted to telling several classics such as "The Three Little Pigs" and "Little Red Riding Hood"). I realized that he might like to have these later. And maybe you'd like to be able to adapt them to your own children.

Each Saturday, check out the Story Page for the next installment of the Superhero Trio! Yes, each of my kids just gained a superpower. ;)